Thursday, September 19, 2013

Cork Underlayment

So now, I'll back track a bit to show you what onerous and tiresome work my brother and I have been doing the last week. It is time to put down the cork underlayment.

My brother and I had struggled over how to deal with the moisture barrier. In the end, we did notice that none was used previous to us, and yet the old linoleum seemed to hold up fine. So we decided to take Stephanie's advice at Cancork and use special fortified mortar that has some water sealant protection.

Honestly, as the renovation goes on and my brother and I get more tired, we are being less and less picky about things that would have mattered to us at the beginning.

OUR NEW MOTTO: "We'll fix it later with mortar." hehe


My brother drew these clever little lines in the mats so that when we pulled them up to mortar we would remember where they went. I'm sure glad I was addicted to puzzles as a kid... well still am, but that's a different story.


Had to make a little pathway so that we didn't dent the mortar underneath.


then we started laying out tile just to check out the configuration and get some of the cut tiles done right. The gap markers are not installed right in this picture. Originally I didn't like how wide the gaps were so we thought about using them this way instead. But in the end, we felt that there's a reason why the gap had to be larger and so we used them the proper way..


Wednesday, September 18, 2013

Finally the Flooring

So far to date, the biggest pain in the reno process was dealing with the floor. Albeit I'll say that we certainly didn't make it easy for ourselves. Going tile changed everything about the flooring, and I mean everything!

First it was pulling off the linoleum and scraping 30+ years and two layers of linoleum glue. (3-4 days)


Then it was experimenting for the first time with self-leveling cement (3 days) and then deciding we needed to do it again (another 3 days)


Then my brother and I went back and forth in our decision about what to do with the underlayment (ongoing!) and finally landed on using cork underlayment and hoping for the best. We acclimatized the cork and laid it with fortified mortar as the moisture barrier (4 days)


We started mortaring down the tiles, only to find that it is back breaking, messy work!


And then I brought out my anal side and started to measure the angled tiles for my brother to cut with the wet saw. Every couple of hours, my brain stops calculating numbers. It feels like Math finals all over again! aaaaaahhhh!!!!


(note to self, always take pictures with natural daylight... no more night pics)

My brother wants to mortar the remaining pieces of tile tonight to let it sit overnight. Then tomorrow we can grout the tile and allow it to be ready for Friday. Solomon will come tomorrow and install the sink and finish off the cosmetic construction.

My remaining homework:

1. Finish measuring the remaining tiles (about 10-12 more left to go)
2. Choose and buy a garburator.
3. Go shopping for pendant lights.
4. Pick up bar chairs (found some on Craigslist)

More details about these steps in following posts. Just wanted to catch you up on where we are in the reno.

My head and body are SO tired!


Thursday, September 12, 2013

Hooray for the Hood Fan!

My brother and I installed the hood fan today. We still need to connect it to the duct to blow the air outside. But at least it's in!


Wednesday, September 11, 2013

Moving to Marmoleum

With a FB response in mind concerning the health risk that may be carried with the use of fabric on the backsplash, I decided I would survey other options. While I understand that burlap has its benefits being rot and fire-resistant It is certainly not clear of other issues:


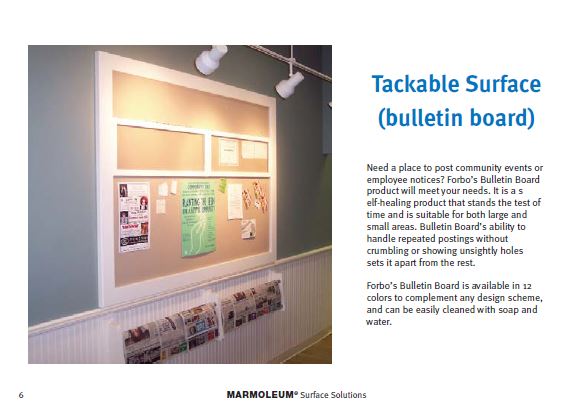
Back when I hand-made favour boxes by scoring and slicing cardboard by hand, I used what was called a self-healing mat. This mat could literally be cut nearly half (in fact, a friend cut it almost down to the bottom) and over time it will heal itself. To this day, I can't find the thousands and thousands of incisions I've made in it over the last eight years!


I suspected that something like this could be used for pin-ups walls too, and then I discovered Marmoleum. Forbo is one of only three European factories left who manufacture this, and coined the term which comes from "Marbled-Linoleum."

This material is commonly used as flooring in schools because of its versatility of uses and its ability to stand up to heavy use in high traffic areas with minimum work to keep clean. While its main use is for flooring, it is also manufactured as bulletin board material which -- get this -- SELF-HEALS. In addition, it carries great qualities like being:
  • eco-friendly (uses renewable resources or plant waste)
  • anti-static (repels dust and dirt, making clean up very easy)
  • bacteriostatic (doesn't harbour micro-organisms such as dust mite or MRSA bacteria - the kind that mutate over time to become immune to current vaccines).


Download a brochure from Farbo on Bulletin Board Marmoleum. Other brochures also exist about other forms of marmoleum for other uses such as flooring and other surfaces.

So I've contact GreenWorks here in Vancouver and am waiting for a reply back with a quote on the beige coloured bulletin board marmoleum. Measuring out the portion of the kitchen where it will be installed, I will be needing at least 22.5 sqft. However since it comes in rolls that are 122cm wide, I would need a 14.5 foot roll (approx 4.39m). I'm at the edge of my seat waiting for the reply!

SOURCES USED:
Green Works, Vancouver B.C. http://www.greenworksbuildingsupply.com/linoleumflooring.html
Farbo Flooring Systems, Hazelton, PA http://www.forboflooringna.com/Surface-Solutions/Products/Bulletin-Board/
How Stuff Works, Atlanta, GA http://home.howstuffworks.com/home-improvement/construction/materials/marmoleum.htm
The Natural Abode, Moscow, ID http://www.thenaturalabode.com/green_home/marmoleum_natural_linoleum.htm

I Found a Console Table To Make!

So for those of you not aware of Ana White's Webpage, it is especially designed for women who want to learn how to build their own furniture, and it is seriously cool! I'm totally revved up for trying some of the plans, and even coming up with my own. I always have very specific ideas of what I'd like to make for unique places in my home and it's nice to finally own a place where I can freely install those unique items for myself!

So if you recall, there is one portion of the kitchen that I did not have Vancouver Cabinets installed, mostly because we thought we would need the keep the costs down, and also, because my idea of what to do there is so specific that it would be better if I built what I needed.

It an extra workspace/bench along the east side of the kitchen.


My plan is to create an extra workspace where I can store my various recycle boxes and trash can underneath. Here in BC, many cites, especially the larger cities, are requiring citizens to recycle. If recyclables are found in the regular trash, it doesn't get picked up. This is fine with me since I have always been an advocate for recycling more than just soda cans and bottles for a refund. Containers and paper trash is mostly accumulated in the kitchen, so that's where I prefer the bins to be.

Today I was sent this in my email from AnaWhite.com:


and I thought HOW PERFECT! I can make this! I will just not include the middle shelf, or as my brother suggested, remove the middle shelf from just one side. It will fit my recycling bins perfectly! Can't wait until the kitchen reno is done so I can get to all the goody crafts like this one! (I'm in desperate need of a spice rack with this new kitchen arrangement.)

Unpacking and Getting the Floor Ready For Tiling

Well before I go on, I didn't show you the front view of the kitchen which includes an unfinished raised eating area in front of the sink:


So the counters that are being installed will be two levels in the sink area. I decided that it was worth it to splurge an extra grand on having this because it's nice to have a kind of shelf in front of the sink  and it also helps hide the mess of dirty dishes or other clutter when looking from the rec room.

My youngest brother came into town today from LA for a visit. So while my other brother picked him up and visited my mom, I unpacked as much kitchen stuff as possible and I laid down the cork underlayment.


It was like Christmas all over again. After 10 months of using my brother's kitchen materials, I had forgotten a lot of the kitchen items that I had carefully chosen. It was much more of a delight than I expected.

But this is also when I realized how little cupboard space I had. There are no wide drawers at all. So I am limited in what I can put in each. The cupboards, which are very high thanks to the removal of the bulkheads, are just that -- very, VERY high. The bottom two shelves, no problem. But because there are no wide shelves, it will be necessary to put some regularly needed items high enough that I will need a foot stool to reach them. 

Ultimately, this is considered a "secondary kitchen" -- one used to store stuff to entertain in the rec room, or a kitchen built for a downstairs tenant. And since I'm just one person, all my items will find a place to go, regardless of the slight awkwardness I am experiencing at the moment.

I will probably do an overview of the cabinets in another post, since this one is getting long. There is lots to review about the good and the not-so-good.


When I cut the cork underlayment for the floor, I was careful to leave around 1/2" on the borders as directed by the sales lady at the cork store. This allows for possible expansion of the cork.

When you step on the cork, it is as warm as a heated floor. I could hardly believe it! I expected it to be a sort of neutral temperature, but it was actually warming my feet! It makes me wonder if I would have gotten a similar sensation with the cork flooring. But I digress... 

Unfortunately, that warm doesn't translate through the tile. Porcelain, as expected will always be cold to the touch. The difference however, is that it is no longer bone-chilling cold going through my legs as it did when I stood directly on the cement. It's a "nice cold" the kind you want to feel when it's blazing hot outside. I can live with that!


Two tips we were given about the tiling. 
  1. Solomon our contractor suggested that we start the tiles from the middle of the room and fan out. The reason for this is because even if a corner may look like a right-angle, there's a 99.9% chance it isn't. Thus if you attempt to start tiling from one wall to the other, you may end up with a trail of squares that eventually lay crooked rather than a straight parallel line to the walls in the rest of the kitchen.
  2. A friend of my brother, who lend us his tile cutter after tiling his bathrooms, suggested considering some pattern other than straight up and down. This is for the same reason Solomon suggested, that even if we start the tiles from the middle they will eventually reach the edge of the "not right-angled" wall, and resulting in the line of the tiles laying slanted next to the baseboards. This makes it obvious that the room is not a perfect rectangular. So my brother suggested a diamond layout as it will appear less "flawed" at a glance.
Solomon suggested to us to lay out the tiles on top of the underlayment to get a sense of where each tile will be. It also gives us the ability to play out how we will cut the remaining tiles and distribute it in the remaining spots. Of course, when we begin tiling, we will still start from the middle, but it takes the guesswork out of how many tiles we will need, and what it will look like in the end.

Again, you can't tell from the picture, but wow, the colour of the tile matches all the kitchen decor. We REALLY lucked out on that sale!!

Oh and just in case you were wondering how the patch job went with the light switch, here's what it looks like now.


NOTE TO SELF: Stop taking pictures at night!  (sorry for the poor colour)

The Next Update on Budget

So here's where we stand so far in our budget:


Still lookin good!

Things still left to purchase:

  1. Garburator
  2. two Pendant Lights
  3. Backsplash wall materials (stainless steel, burlap, frame and pinnable foam)
  4. Remaining contracting work (finishing walls and trim, and installing sink)


My brother has requested a turkey dinner as the inaugural feast cooked in the kitchen. I was thinking just ramen and rice. Let's see what we end up with!  

P.S.  If you are wondering what will happen to this blog after the renovation is over, I'll let you in on the plan. I will adjust the title of the blog, but the address somiskitchen.blogspot.com will remain the same. I will blog about the features in the new kitchen, including new appliances and kitchen products that I purchase(d). As well, I hope to post some cooking tips and recipes,as I have always wanted to do. Maybe I'll throw in some tips for living and eating healthy, something that I need to get back on board with now that the major trauma in my life is slowly coming to an end. Our family grew up with a Mom who was fierce about nutrition and whole/healthy foods. Can't stop being my mother's daughter! Time to remove this depression weight and get back to real life!